初始化项目
这里我们使用官方的 vue-cli 初始化一个 Vue 项目
1
2
3
4
| sql复制代码npm install -g @vue/cli
# or
yarn global add @vue/cli
vue create admin-ui
|
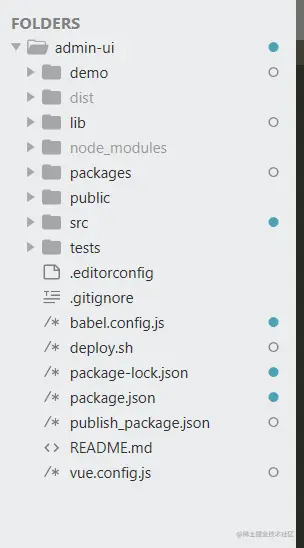
admin-ui目录结构:
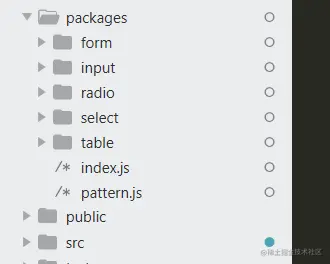
在src的同级目录创建packages文件夹,用于存放需要打包的组件:
接下来让我们写一个简单的Vue component,基于elementUI的input组件的封装:
1
2
3
4
5
6
7
8
9
10
11
12
13
14
15
16
17
18
19
20
21
22
23
24
25
26
27
28
29
30
31
32
33
34
35
36
37
38
39
40
41
42
43
44
45
46
47
48
49
50
51
52
53
54
55
56
57
58
59
60
61
62
63
64
65
66
67
68
69
70
71
72
73
74
75
76
77
78
79
80
81
82
83
84
85
86
87
88
89
90
91
92
93
94
95
96
97
98
99
100
101
102
103
104
105
106
107
108
109
110
111
112
| kotlin复制代码<template>
<div v-show="showInput">
<el-input v-model="currentValue" v-bind="$props" @keydown.enter.native="handleInputEnter" :placeholder="placeholder" :dataType="dataType" ref="input" :inputPattern='inputPattern'>
</template>
</el-input>
<div :style="{ visibility: !!editorErrorMessage ? 'visible' : 'hidden' }">{{ editorErrorMessage }}</div>
</div>
</template>
<script>
import { Input, Button, Select, Option } from 'element-ui'
import pattern from '../../pattern.js'
const EMAIL_ERROR = '邮箱验证失败';
export default {
name: "FkInput",
data() {
return {
editorErrorMessage: null,
showInput: true,
inputType: '',
emailPattern: pattern.email
};
},
props: {
...Input.props,
...Button.props,
...Select.props,
...Option.props,
value: {
type: [Number, String],
default: ''
},
placeholder: {
type: String,
default: '请输入内容'
},
inputPattern: {
type: [Object, String],
default: null
}
},
computed: {
currentValue: {
get: function() {
return this.value;
},
set: function(newValue) {
this.$emit("input", newValue);
}
}
},
methods: {
evtChange(newValue, lr) {
this.$emit('change', newValue, lr);
},
handleInputEnter() {
if (this.inputType !== 'textarea') {
this.validate()
}
},
validate() {
const type = this.dataType && this.dataType.toLowerCase();
var pattern = this.inputPattern ? this.inputPattern.pattern : '',
message = this.inputPattern ? this.inputPattern.message : '';
if (type || pattern) {
switch (type) {
case 'email':
pattern = this.emailPattern;
message = EMAIL_ERROR;
break;
default:
break;
}
if (pattern && !pattern.test(this.currentValue || '')) {
this.editorErrorMessage = message;
return false;
}
}
this.editorErrorMessage = '';
}
},
mounted() {
this.$nextTick(_ => {
this.inputType = this.$refs.input.type;
})
console.log('mounted');
},
updata() {
},
watch: {
currentValue: {
immediate: true,
handler(val) {
this.$nextTick(_ => {
if (this.inputType !== 'textarea' && val !== '') {
this.validate();
} else if (val == '') {
this.editorErrorMessage = ''
}
});
}
}
}
}
</script>
<style stylus="css">
</style>
|
组件需加上name属性,在使用组件时,用的就是name的值作为标签值,上面的input组件在使用时 <fk-input></fk-input>
配置项目
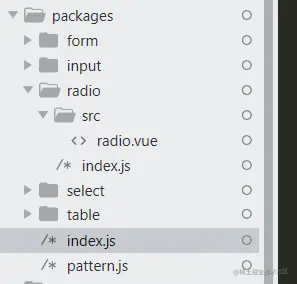
下面我们来配置当前项目, 以使其可以发布到 npm 上.如果组件进行按需引入,我们需要每个组件注册到Vue上,因此单个组件中需要暴露我们的Component:
1
2
3
4
5
6
| javascript复制代码/packages/input/index.js
import FkInput from './src/input.vue'
FkInput.install = function (Vue) {
Vue.component(FkInput.name, FkInput)
}
export default FkInput
|
然后我们编辑入口文件 packages/index.js,使其被作为UI库导入时能自动在Vue中注册我们的Component:
1
2
3
4
5
6
7
8
9
10
11
12
13
14
15
16
17
18
19
20
21
22
| javascript复制代码import FkInput from './input/index.js'
const components = [
FkInput
]
const install = function(Vue) {
components.forEach(component => {
Vue.component(component.name, component);
});
}
if (typeof window !== 'undefined' && window.Vue) {
install(window.Vue);
}
export default {
FkInput,
install
}
export {
FkInput,
install
}
|
elementUI的引入方式有两种: 一是按需引入:
1
2
3
| css复制代码import { Button,Input } from 'element-ui'
Vue.use(Button)
Vue.use(Input)
|
二是全局引入方式:
1
2
| javascript复制代码import ElementUI from 'element-ui'
Vue.use(ElementUI)
|
此处也是为了可以使用按需引入的方式进行加载组件,export了两次;
export暴露出来可以在使用时按需引入,export default暴露出来的组件只能在使用时全局引入。
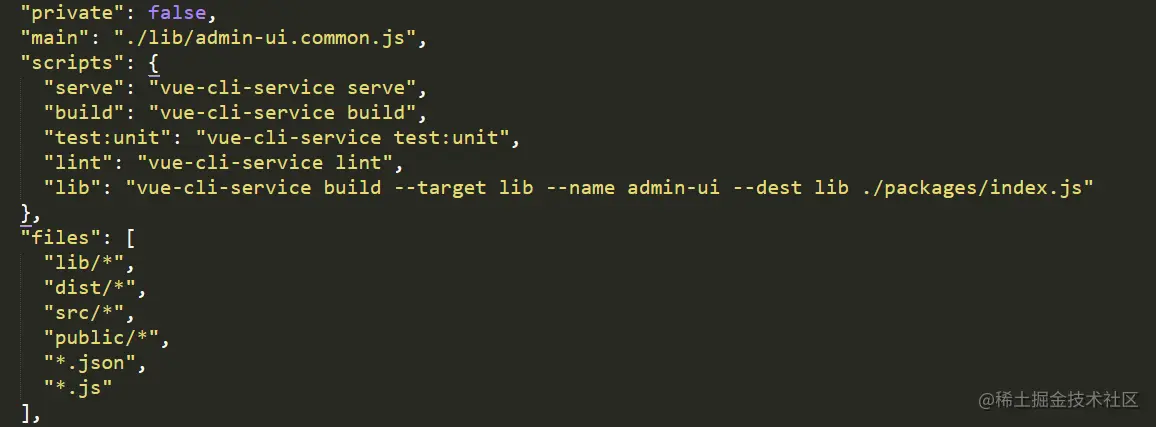
接下来我们添加 build项目的脚本到package.json的scripts中:
 其中 –name admin-ui 指定的是要发布的library的名称,我们执行上面新家的脚本:
 npm run lib 这里我们选择默认发布我们的 *.common.js 文件, 所以我们在 package.json中添加main属性.

指定该属性后, 当我们引用该组件库时, 会默认加载 main 中指定的文件.
最后, 我们再配置 package.json中的 files属性, 来配置我们想要发布到 npm 上的文件路径.
我们这里将用户引用我们的组件库可能用到的所有文件都放进来:
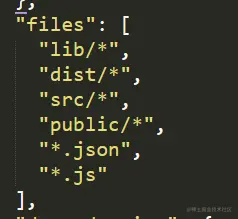
最终的配置为:
发布到npm
首先我们注册一个 npm 账号 (如果已有账号, 可以跳过此步骤) 也可以通过网页注册 www.npmjs.com/
然后使用 npm login 登录注册号的状态
登录后可以使用 npm whoami 查看登录状态
在发布之前, 我们修改一下项目的名称(注意不要和已有项目名称冲突), 推荐使用 @username/projectName 的命名方式.
接下来我们就可以发布我们的 UI 组件库了, 在发布之前我们再编译一次, 让build出的文件为我们最新的修改:
我们使用下面的命令发布我们的项目:
1
2
| arduino
复制代码npm publish --access public
|
需要注意的是 package.json中指定的version属性: 每次要更新我们的组件库都需要更新一下version,配置中的private属性需要设置为false
本地安装使用
这样我们就完成了自己的 UI 组件库的发布. 接下来我们可以在任何需要使用到该组件库的项目中使用: npm install admin-ui
1
2
| arduino复制代码import UI '@ssthouse/admin-ui'
Vue.use(UI)
|
接下来我们就可以在自己的项目中使用这个组件了组件库中的 Component了:
1
2
3
4
5
6
7
8
9
10
11
12
13
14
15
16
17
18
19
| xml复制代码<template>
<fk-input v-model="input" :inputPattern="inputPattern" clearable></fk-input>
</template>
<script>
export default {
name: '',
data() {
return {
input: '',
placeholder: '',
inputPattern:{
pattern: /[\w!#$%&'*+/=?^_`{|}~-]+(?:\.[\w!#$%&'*+/=?^_`{|}~-]+)*@(?:[\w](?:[\w-]*[\w])?\.)+[\w](?:[\w-]*[\w])?/,
message: '此信息是验证失败提示'
}
}
}
}
}
</script>
|
经过上面这些步骤后, 我们就拥有了一个属于自己的组件库了. 我们可以随时更新, 发布自己新版的组件库.
而依赖了该组件库的项目只需要使用简单的 npm 命令即可。
已实操:基于ElementUI封装一个自己的UI组件库 - 掘金 (juejin.cn)